|
Backup and Restore |

|

|

|

|
|
Backup and Restore |
|
|
|
|
A data backup and restore utility is provided in the Astra Schedule installation. This utility can be used to create a backup for safekeeping or to provide technical support with a copy of your data for troubleshooting purposes. Additionally, a previous backup can be restored to return to a certain state after a failure.
To create a backup file of your Astra Schedule data, perform the following:
1.On the application server, select Start > All Programs > Ad Astra Information Systems > 7.x.x (your version) > Tools > Astra Data Backup.
The following application will be launched.
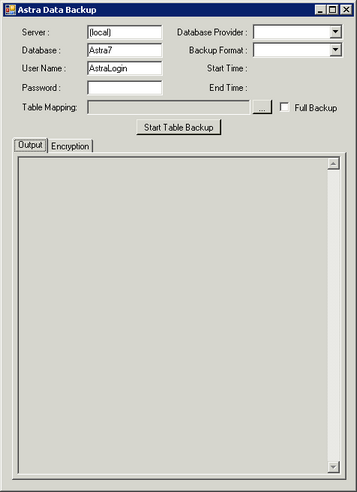
2.Select the database provider from the drop down menu. (SQL or Oracle)
3.If the database is MS SQL Server, enter the server name.
4.Enter the database name that should be backed up.
5.Enter the user name for the database.
6.Enter the password for the specified user.
7.Check the "Full Backup" option.
8.Click the Start Table Backup button.
When the backup is finished, the backup file can be located in the Tools folder in the Astra Schedule installation.
To restore a copy of the data using an Astra Schedule backup, perform the following:
1.On the application server, select Start > All Programs > Ad Astra Information Systems > 7.x.x (your version) > Tools > Astra Data Restore.
The following application will be launched.
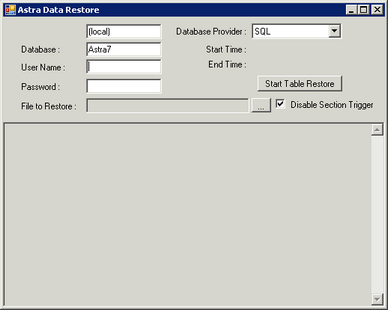
2.Select the database provider from the drop down list.
3.If the database is MS SQL Server, enter the server name.
4.Enter the database into which the data will be restored.
5.Enter the user name for the specified database.
6.Enter the password for the specified user.
7.Click the browse button next to "File to Restore" and browse to and select the file to be restored.
(the default location is the Tools directory in the Astra Schedule application installation)
8.Click the Start Table Restore button to restore the database.
Page url: ?backup_and_restore.htm

