|
Implementation and Installation Notes |

|

|

|

|
|
Implementation and Installation Notes |
|
|
|
|
Astra Schedule VII interfaces with Datatel Colleague on UniData via the 32 bit UniData ODBC driver and UniData database views generated by the IBM Visual Schema Generator (VSG). The IBM VSG tool enables the creation of normalized SQL views for use as a translation layer between Astra Schedule VII and the Datatel UniData database. The interface deployment requires that Astra Schedule-specific views be created in the applicable Datatel database using IBM VSG. Additionally, a system must be defined on the DSN for an ODBC connection utilizing the UniData 32 bit ODBC driver on the Astra schedule VII application server. Once the views are configured and the ODBC connection is established, the Astra Schedule application will generate SQL queries and update statements against the views via the ODBC connection to the Datatel database to perform imports and exports.
Requirements for the interface setup are UniData ODBC Version 3.1.7 or higher (installed on the Astra Schedule VII application server) and Visual Schema Generator 3.1.2 or higher (32-Bit). Both components should be available from IBM as a Datatel customer.
Before installing Astra Schedule, the following steps must be performed:
1.Install the UniData 32 bit ODBC driver on the server hosting the Astra Schedule application. (The UniData 32 bit ODBC driver is required to make a connection to the Datatel UniData database.)
2.Configure uci.config file for ODBC to access the Datatel database.
3.Install the IBM VSG tool on the application server and connect to the appropriate Datatel database.
4.Launch VSG and create sql views for the following Datatel tables used by the interface:
COURSE.SECTIONS - use SQL name COURSE_SECTIONS
COURSE.SEC.MEETING - use SQL name COURSE_SEC_MEETING
COURSE.SEC.FACULTY - use SQL name COURSE_SEC_FACULTY
PERSON - use SQL name PERSON_1
5.Create a custom virtual field called “ASTRA_SEC_ACTUAL_ENROLLMENT” per specifications below in the dictionary file for the COURSE_SECTIONS view created in step 4.
:AE DICT COURSE_SECTIONS ASTRA_SEC_ACTUAL_ENROLLMENT
Top of "ASTRA_SEC_ACTUAL_ENROLLMENT" in "DICT COURSE_SECTIONS", 9 lines, 147 characters.
001: I
002: DCOUNT(SEC_ACTIVE_STUDENTS,@VM)
003:
004: ACT. ENROL.
005: 3R
006: S
6.Create the base views and user access for a user in the Datatel database to be used for the interface with Astra Schedule.
Click here for a list of Astra Schedule views.
Click here for a list of Platinum Analytics views.
7.Create the additional views and sub-tables using VSG for each table needed by the Astra Schedule interface. The following SQL may be executed from VSG to build the views appropriately. The views should be named as recommended below to match the default SQL used by the interface.
Click here for a list of Astra Schedule views.
Click here for a list of Platinum Analytics views.
8.Configure a DSN (Data Source Name) to the database using the Windows ODBC administrator. (Control Panel/Administrative Tools/Data Sources)
9.Configure a connection to the Datatel database. The DSN will be referenced by the Astra Schedule VII msi installer.
10.Verify the connection.
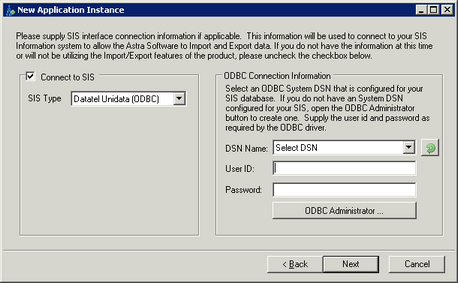
11.Install Astra Schedule. During the installation process you will select Datatel Unidata as the SIS connection and provide the DSN, User ID, and Password, as shown below.
Page url: ?datatelcolleaguesis(unidata)interfaceaddendum_1.htm

