Astra Schedule Accounting Activation and Setup |

|

|

|

|
Astra Schedule Accounting Activation and Setup |
|
|
|
|
When performing the Astra Schedule installation, the installation utility will prompt the installer to optionally enable the accounting integration. If this accounting flag is enabled, then the installer will require additional information regarding the ObjAcct installation. The process of enabling the accounting integration can take place during initial installation of Astra Schedule, or as an enhancement to an existing installation using the installer control panel.
To configure the integration with ObjAcct, perform the following:
1.Launch the Astra Schedule installation utility or control panel and follow the on-screen prompts until presented with the accounting setup screen.
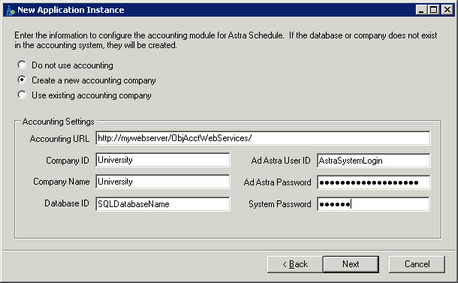
2.Enter the accounting module setup information
•Enter the Accounting URL.
This value is the URL of the ObjAcct virtual directory created during the accounting server installation. Example: http://mywebserver/ObjAcctWebServices/.
See Accounting Server Installation for more information.
•Enter the Company ID.
This value is the unique company identifier used by ObjAcct. This value should be the Astra Schedule institution name. This is also used when you log in into the ObjAcct client application. Do not use demo or systemmanager.
•Enter the Company Name.
This value can be the same as the Company ID unless a different name is desired.
•Enter the Database ID.
This value is the name of the ObjAcct application SQL database in which the new company (institution) should be created. This database will be created by Astra Schedule during installation if it does not exist. If the database already exists, the new company will be created in the existing database.
•Enter the Ad Astra User ID.
This value is the desired user id of the initial admin user that will be created for the ObjAcct company created for this Astra Schedule instance.
![]() NOTE: The admin login being created here is the login that will be used by the Astra Schedule system to communicate with the accounting system. This login should not be used to access the accounting system otherwise. Logging in to the accounting system as this user will disconnect Astra Schedule and create communication errors.
NOTE: The admin login being created here is the login that will be used by the Astra Schedule system to communicate with the accounting system. This login should not be used to access the accounting system otherwise. Logging in to the accounting system as this user will disconnect Astra Schedule and create communication errors.
•Enter the Ad Astra Password.
This value is any valid password for the initial admin user being created.
![]() NOTE: The ObjAcct application requires that passwords be at least 6 characters. If the Astra Schedule system attempts to provide a password for either the system or a user that does not meet this requirement, the login will fail.
NOTE: The ObjAcct application requires that passwords be at least 6 characters. If the Astra Schedule system attempts to provide a password for either the system or a user that does not meet this requirement, the login will fail.
•Enter the System Password.
This value is the ObjAcct suite system admin password. The default is abc123. Enter this value, or if the password has been changed since installation, enter the new password.
3.Continue the Astra Schedule installation. See the Astra Schedule VII Installation Instructions for more specific details on the installation process.
Page url: ?accounting_activationandsetup.htm

