Accounting Application Setup Overview |

|

|

|

|
Accounting Application Setup Overview |
|
|
|
|
The ObjAcct application requires some initial setup before Astra Schedule accounting processes can take place at your institution. Minimum requirements are provided here as a starting point. Please refer to the ObjAcct application help for more specific setup instructions.
The upper level in the ObjAcct application hierarchy is the Company. This entity maps to the Astra Schedule Institution upon installation. ObjAcct administrators have the ability to edit Company settings, including global system defaults, user and role configuration, and report customization. The Company settings can be found on the Company menu in ObjAcct when logged in as an administrator.
One specific example is the "Use Inventory" option on the Inventory page in Company Setup. Checking this option enables inventory tracking functionality in ObjAcct that is in conflict with the equipment and service management integration provided by Astra Schedule. These two pieces of functionality are incompatible and errors will occur.
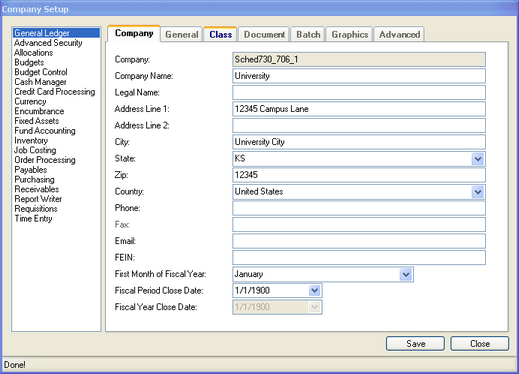
One Company setting that may be desired, however, is the company name and address. This information may be desired for reporting purposes, and is displayed on many of the default reports. To edit the company name and address, perform the following:
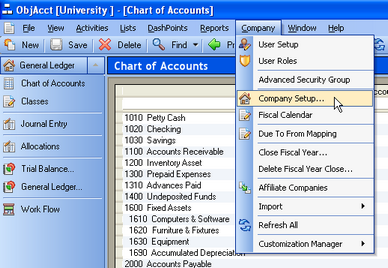
1.Log in to the ObjAcct application as an administrator.
2.Click on the Company drop-down menu and select Company Setup. 3.The Company Setup window will be displayed. The Company tab for the General Ledger option should be selected by default. 4.Edit the Company Name and Address information.
5.Click Save and then Close to return to the application. |
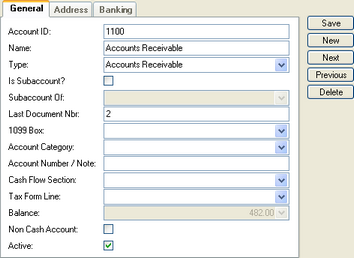
An extensive chart of accounts is provided by default in the ObjAcct application. This list should be reviewed to make sure that it will meet the needs of your institution. It is likely that the default list includes many accounts that will not be used. Accounts can be added, edited, or deleted as desired to create a chart of accounts that is appropriate. The final list may be a very basic chart of accounts, or your institution may have a chart of accounts already that must be used. At a minimum, the chart of accounts may include the following:
•Accounts Receivable Account (amount due from customers) •Revenue Account (chargeable items) •Cash Account (record payments)
To review the Chart of Accounts, perform the following:
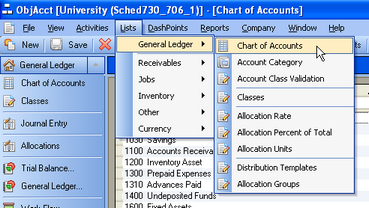
1.Log in to the ObjAcct application as an administrator.
2.Click on the Lists drop down-menu and select General Ledger > Chart of Accounts. 3.When the Chart of Accounts list is displayed you may scroll the list to view all accounts and sub-accounts.
4.Click on an individual account to view its details in the panel below the list. 5.Use the details panel to edit and save changes to accounts, create new accounts, or delete accounts that are not needed. |
Price Levels are used to associate customers with specific prices and discounts on items. Price levels must be defined in order for different prices, discounts, or premiums, to be charged per item based on the customer. In the absence of price levels, the default unit price for the item is charged.
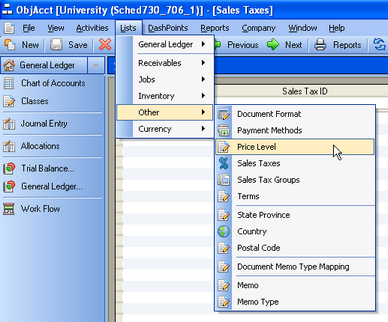
To define price levels, perform the following:
1.Log in to the ObjAcct application as an administrator.
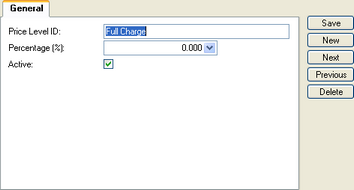
2.Click on the Lists drop-down menu and select Other > Price Level. 3.When the Price Level list is displayed, use the detail panel below to enter a new price level name. 4.If a discount or premium is to be applied for the price level, enter a percent value. This value will be applied to the item default price if no item sales price is defined for the price level. If defined, item sales prices and discounts will be used instead.
5.Make sure the price level is Active if it is to be available for use.
6.Click Save. |
Customer records are added to the ObjAcct database along with other data during the initial export. Various attributes can be configured for customer records in ObjAcct including account number, address, default sales tax, and default price level. The default price level allows the system to associate specific pricing for items with the customer in question. Customers with no default price level will be charged the default unit price for the item.
To define the default price level for a customer, perform the following:
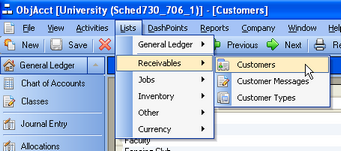
1.Log in to the ObjAcct application as an administrator.
2.Click on the Lists drop-down menu and select Receivables > Customers. 3.Scroll the customer list and click on a customer row to view the details in the panel below.
4.Use the Price Level drop-down menu to select a default price level for the customer.
5.Click Save. |
After the Astra Schedule room, equipment, and service records are added to the ObjAcct database (see Export Initial Data), pricing must be configured before charges can be applied. Each chargeable item can have a default price defined, as well as multi-level, tiered pricing using Price Levels.
Default Pricing
Default item pricing is only used when more specific item pricing per price level is not configured. An item's default unit price is applied when there is no price recorded for the item for the customer's price level.
To configure default unit pricing for an item, perform the following:
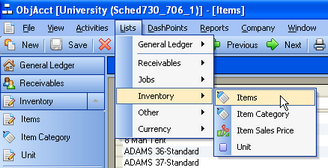
1.Log in to the ObjAcct application as an administrator.
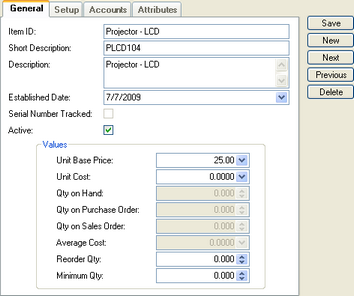
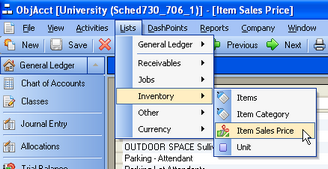
2.Click on the Lists drop-down menu and select Inventory > Items. 3.The displayed list of items will include all rooms, equipment, and services from Astra Schedule. Scroll the list to identify an item and click the item row to view its details in the panel below. 4.On the General tab, enter a Unit Base Price for the item. 5.Click Save.
Item Sales Price
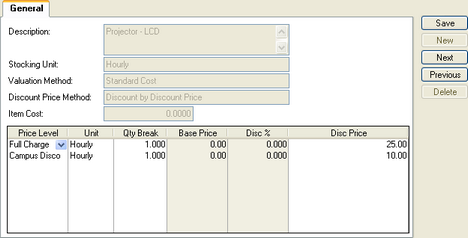
The Item Sales Price list in ObjAcct allows for multi-level tiered pricing to be configured per item. This is achieved by configuring the unit, quantity break, and either discount percent or discount price per price level, per item. When a price is applied for an item, the item sales price is first checked to see if the item in question has a price configured for the customer's price level and item quantity. The item's default price is only used if the there is no applicable item sales price defined. This setup is used so that varying prices can be applied per customer price level, per item.
To configure an item's sales price, perform the following:
1.Log in to the ObjAcct application as an administrator.
2.Click on the Lists drop-down menu and select Inventory > Item Sales Price. 3.Scroll the list of items and click a row to view the sales price details in the panel below.
4.Select a price level from the drop-down list, or add a new price level.
5.Select a unit from the drop-down list that will be applied to the price level, or add a new unit.
6.Enter the quantity break value for the price level. The sales price being configured here will be applied when the quantity break value is equal to or less then the transaction quantity.
7.Depending on the Discount Price Method for the item, enter either the discount percent, or the discount price that will be applied for this price level.
8.Click Save.
9.Repeat as needed for each price level and item that requires special pricing. |
The user security settings in Astra Schedule apply only to the relationship between the two systems and features within Astra Schedule. ObjAcct-specific user security settings may be configured to control user access to the ObjAcct system at a much more granular level. Additionally, you may have users that need access to the ObjAcct application that are not Astra Schedule users. User entered manually in ObjAcct are not maintained by Astra Schedule and will have no impact on users that are part of the integration.
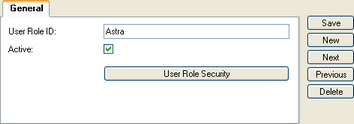
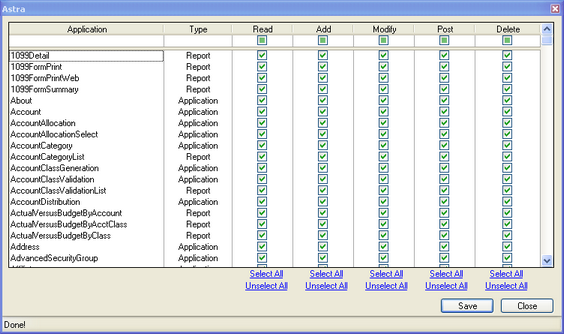
The user security model in ObjAcct is similar to that of Astra Schedule. Users are created and assigned a role. The role definition contains the specific security settings. By default, Astra Schedule users that are granted permission to the ObjAcct application are assigned an ObjAcct role called "Astra". The Astra role contains all permissions.
Roles
To review permissions or add a new role, perform the following:
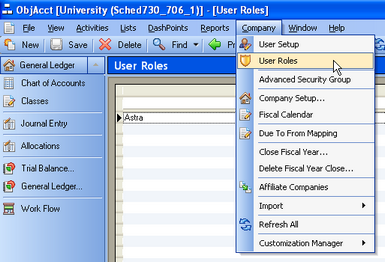
1.Log in to the ObjAcct application as an administrator.
2.Click on the Company drop-down menu and select User Roles. 3.Click on the name of the Astra role on the list. The role information will be displayed in the panel below.
4.Click the User Role Security button to view individual permissions.
5.Edit permissions as desired and click Save.
6.Click Save on the role details panel.
7.You may add a new role by clicking New, entering a unique User Role ID, and then repeating the above procedure.
Users
To review or edit users, perform the following:
1.Log in to the ObjAcct application as an administrator.
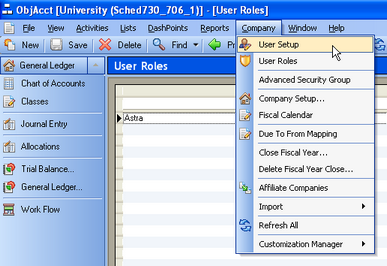
2.Click on the Company drop-down menu and then select User Setup.
3.Click on a user row in the list. The user details will be displayed in the panel below.
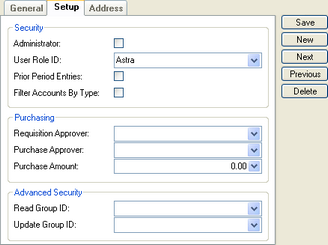
4.Click on the Setup tab to view the role associated with the user.
5.Use the User Role ID drop-down menu to edit the role association if desired.
6.Click Save. |
Page url: ?accounting_objacctsetupoverview.htm