The Event Form |

|

|

|

|
The Event Form |
|
|
|
|
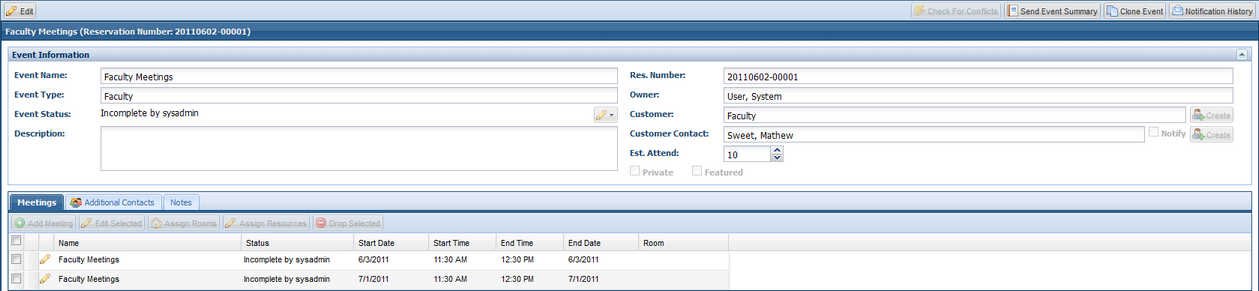
After clicking on a specific event or event meeting record, the system will display the event form. The event form includes general information about the event in the top panel. This is where you will find the event name, event type, overall event status, description, reservation number, event owner, customer and primary contact, and estimated attendance.
Aside from the primary customer contact associated with an event, any number of additional contacts may be recorded as well. The additional contacts feature allows you to record campus sponsors, students, emergency contacts, or any other person associated with the event that may need to be kept in the loop or contacted for any reason.
To access Additional Contacts, click the Additional Contacts tab within the event form.
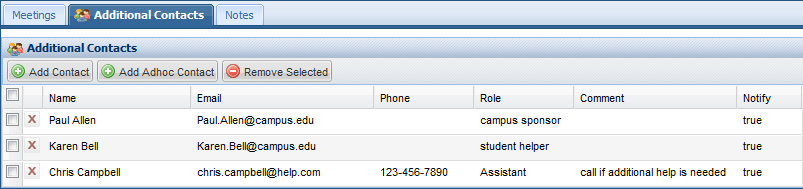
Additional contacts can be any contact contained within the Astra Schedule contact database, whether they are associated with the event customer or not, or any adhoc person you wish to record temporarily with only an individual event.
To add an Astra Schedule contact to the event, click the Add Contact button while in edit mode, browse and select the contact(s) you would like to add, then click Add and Close. The contact(s) will now appear in the list.
To add an Adhoc Contact to the event, click the Add Adhoc Contact button while in edit mode. A new contact row is added to the list. Click to insert your cursor in each field and enter the contact information. This record is not added to the Astra Schedule database and is only recorded in association with the event in question.
Role and Comment fields are provided for use in recording the purpose of their association with the event and any notes. Both fields allow free text to be entered.
The Notify option for both Additional and Primary contacts is a convenience flag that simply includes that contact by default when event notification messages are sent. The notification recipient list can still be manually modified on-the-fly as well.
The history of internal and external messages generated for each event is logged and viewable from within the event record. The notification history log displays the name or description of the message that was generated, the recipient(s), the sender, and the date the message was sent.
To view the message history for an event, click the Notification History button ![]() at the top of the event form.
at the top of the event form.
The notification history log window is displayed for viewing.
Just below the event information panel is a tabbed interface that displays the event's meeting(s). The Meetings tab is a meeting summary list that will include all meetings for the event. The meeting names, statuses, times, dates and location are all included here at a glance.
In-grid editing is supported for some of the basic attributes of the meetings. While in edit mode, click directly in the field to edit a Meeting Name, Status, Date, Time, Actual Attendance, or Featured/Private flags.
Click the icon next to the meeting name to view the full meeting detail for any meeting on the list.

A new tab is created for each open meeting. Note that when a meeting detail is viewed, the event information panel is automatically collapsed to provide as must screen space as possible. It is re-expanded if you click on the Meetings tab.
An event may have one or more meetings, each of which has details that can be managed individually. The meeting details tab begins with the basic meeting information, including the meeting name, type, status, date and time, customer and contact, attendance values, and location. This basic information exists for all meetings.
Additional, related meeting details may be recorded in the Related Activities tab below the Meeting Information panel, including setup and teardown times, pre and post meeting times, and/or scheduled equipment and services. Each additional activity recorded appears on its own row, with activities presented in chronological order by default. Each activity may be edited either directly in the list grid or by using the edit icon where applicable.
Equipment and Services
Assigned Equipment and Service times and dates can be edited independently. "Setup" and "Teardown" service times must fall within a setup or teardown window.
Times may be marked “Exclusive”, meaning that no other activities may be scheduled at the same time. The system will validate that nothing is scheduled in conflict with an exclusive service.
Times may also be marked "Ignore", meaning that the time associated with the activity can be disregarded. This is most often applicable to setup and teardown services that are inherited but not required due to circumstances.
The pre and post meeting option allows additional meeting components to be added, managed, and viewed from within a single meeting record. Examples for the use of this option include customer access prior to meeting, seating time before a meeting, meet-and-greet time, or any other room reservation need associated with the meeting. Pre and post meetings can be added, edited, and deleted from within the Related Activities tab.
Pre and/or post meeting records can be marked “Exclusive”, meaning that no other activities may be scheduled at the same time. The application will validate that nothing is scheduled in conflict with an exclusive pre or post meeting.
Setup and Teardown Service Windows
Scheduled or inherited services that require the use of the room must occur within a setup or teardown service window. Through the manipulation of the service window an event scheduler can control and visualize when services will take place and for how long the room is unavailable for other scheduling. Service windows are automatically generated for the meeting whenever a service is scheduled that requires the use of the room. Manual intervention is only required if the service window duration needs to be increased or moved to a different time or date. Multiple service windows can be created to accommodate special cases.
Setup and teardown service windows must be at least as long as the combined minimum duration of all scheduled in-room services. The application will validate that service windows are large enough to accommodate all services, including “Exclusive” services, and that the window does not conflict with the event meeting itself or any other unrelated activities.
Setup and teardown service windows can be added and edited as needed within the Related Activities tab.
Move with Meeting
Related activities for an event meeting are intentionally independent of the meeting time and date so that they may be scheduled on any time or day to accommodate the event. For example, setup services may need to occur on Friday evening for a meeting that is scheduled for Sunday afternoon. In most cases, related meeting activities are either intentionally separated from the meeting, or in a fixed position relative to the meeting.
Because event meetings can have various related activities configured, it can be tedious to manage them when and if the meeting time or date should change. To make this easier, a "Move with Meeting" flag is available on all related activities.
If "Move with Meeting" is marked as "true" for an activity, then it's time and position relative to the meeting time is maintained when the meeting time is edited. Therefore, if the related activity is directly adjacent to the meeting, it will automatically be adjusted when the meeting time is edited. Likewise, if there is a gap between the activity and the meeting, that gap will be maintained as well. "True" is the default setting for this option.
If "Move with Meeting" is marked as "false", then it is assumed that the related activity is to be managed manually. These activities will not be moved automatically when the meeting time or date is edited.
When an event record is saved the system automatically checks all meetings for any conflicts due to room or resource assignments or other scheduling problems created by setup and teardown times or other related activities associated with meetings. This validation check can be invoked manually at any time while working on an event. This can be handy when editing a complex event to help make sure that everything created is fitting in as intended.
To invoke the event validation and conflict checking utility, click Check for Conflicts while in edit mode in an event.
![]()
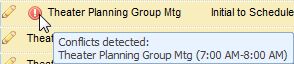
If conflicts are detected, you will be prompted to either resolve the scheduling conflicts by selecting different rooms or return to the meeting list to resolve the conflicts through date/time edits.
When returning to the meeting list, the meetings with conflicts are highlighted and a warning icon is displayed. Hover over the icon to view the activity in conflict as show below.
Page url: ?the_event_form.htm

